
X2: Creating a Web Page
The original idea of the Web was that it should be a collaborative space where you can communicate through sharing information. — Tim Berners Lee
Looking at the proliferation of personal web pages on the Net, it looks like very soon everyone on Earth will have 15 megabytes of fame. — M.G. Sriram
The World Wide Web is probably the most pervasive and visible aspect of computing today. Initially designed as a way for researchers to share documents over the Internet, the Web has evolved into a widespread, dynamic medium for communication and commerce. Using a Web browser, people can instantly access documents (referred to as Web pages) stored on computers around the world. With just a few clicks of a mouse, Web users can read news, check sports scores, send email, play interactive games, or interact with friends. In addition, the Web provides an easy-to-use interface for shopping and other business transactions, with companies such as Amazon and Shopify providing access to a wide variety of products online.
In this chapter, we introduce the basics of Web design and its underlying language, HTML. As you read, you will be presented numerous interactive examples and exercises that allow you to explore the concepts further. By the end of the chapter, you will be able to join the Web community by creating your own Web page and making it available to the world.
HTML Basics
A Web page is a text document that contains additional formatting information in a language called HTML (HyperText Markup Language). Using HTML, a Web page creator can specify various features of a page, such as a section heading, a table of rows and columns, or an image to be displayed. This information is then interpreted by a Web browser, which formats the page contents appropriately.
HTML Tags
HTML specifies formatting within a page using tags. In its simplest form, a tag is one or more words surrounded by angular brackets (< >). For example, every Web page should begin with the tag <!doctype html>, which specifies that the document contains HTML formatting information, and that the browser should interpret the contents accordingly. The tags <html> and </html> mark the beginning and end of the page content. Within the html tags, the page is divided into two sections: a head section, which is delimited by the tags <head> and </head>, and a body section, which is delimited by the tags <body> and </body>.
The head section of an HTML document contains information about the page itself. For example, the head section in EXAMPLE 2.1 contains two elements. The first element is meta, which provides metadata about the page. Metadata is not visible in the page, but is page-specific information that documents page features. Here, a meta tag identifies the author of the page. The second element is delimited by the tags <title> and </title>. When a browser displays the page, the text occurring between the title tags is displayed in the tab at the top of the browser window.
The body section of an HTML document contains the text that will appear in the page. For example, the body section in EXAMPLE 2.1 contains the sentence "Text that appears in the page." To see the resulting Web page in a browser window, click on the "See in Browser" button to the left.
EXERCISE 2.1: Click on the "See in Browser" button to confirm that the page appears as described. Then, replace the text "Title of the Page" with your name. Click on the "See in Browser" button to confirm that the title at the top of the browser window is changed.
EXERCISE 2.2: Modify the HTML document from EXAMPLE 2.1 by replacing the default contents, "Text that appears in the page.", with a sentence or sentences of your own. Click on the "See in Browser" button to confirm that your modification works as intended.
EXERCISE 2.3: The meta tag that appears is for documentation purposes only. Remove this tag from the document in EXAMPLE 2.1 and confirm that there is no change to the resulting Web page.
 Designer Secrets
One of the goals in the original design of the World Wide Web was transparency. When you view a Web page in a browser, you also have the ability to view the underlying HTML source code of that page. In Google Chrome, this is done by selecting "Developer" under the "View" menu and then choosing "View Source." In short,
View → Developer → View Source
The ability to inspect the HTML code that defines a Web page is useful to developers, as it allows the developer to learn from other people's pages. For this reason, it is important to always include a meta tag with your name as author in any HTML document you create.
HTML Elements
Most HTML tags come in pairs, with the first tag marking the beginning of a section and the second tag (which is identical to the first except for the slash /) marking the end of the section. For this reason, we refer to them as opening and closing tags, respectively. For example, <title> is the opening tag for the page title and </title> is the closing tag. HTML elements, which form the building blocks of Web pages, are made up of text and the tags that specify the text's purpose within the page. For example, <title>Title of the Page</title> can be referred to as a title element, because it represents the piece of the Web page that specifies a title. Likewise, the html element that begins with the <html> opening tag and ends with the </html> closing tag itself contains head and body elements.
As the !doctype and meta tags show, not all tags require a closing tag. The !doctype tag does not need a closing tag because the single tag suffices to identify the content type of the document. Similarly, the meta tag does not require a closing tag since the documentation is embedded in the tag itself. Both of these tags form HTML elements by themselves.
Some tags require additional information, or attributes, to complete their definition. For example, the <meta name="author" content="Dave Reed"> tag includes a name attribute that specifies the name of the item being documented and a content attribute that specifies the specific name.
Document Formatting
When you added sentences to the HTML document in EXAMPLE 2.1, you may have found that the text didn't appear in the browser window exactly as you typed it. This is inevitable, as the size of the browser window in which the page is displayed may vary. The lines you typed might be too long to fit in the window or might leave wasted space at the end. To ensure that Web page text looks attractive on various window sizes, the browser automatically adjusts the length of lines to fit the current window, wrapping text to the next line as needed. You may also have noted that, when the browser performs this automatic formatting, it ignores any blank lines, extra spaces, and tabs in your text. When displayed in the browser, any consecutive spaces, tabs, or blank lines will appear as a single space.
Text Spacing & Formatting
Despite the browser's automatic formatting features, Web designers can control some text spacing and formatting by using additional HTML elements. A paragraph element specifies text that is to be treated as a paragraph. Text enclosed within the opening tag <p> and the closing tag </p> will be displayed with a blank line before and after. If you wish to break text explicitly within a paragraph without inserting a blank line, you can place a break element in the text. Unlike the paragraph element, which has opening and closing tags (because there is a logical beginning and end to the paragraph), a break element is defined by a single tag: <br>. Text that follows a <br> tag will be displayed starting on a new line. In addition, if you don't want to begin a new line but would like to force consecutive spaces in the text, you can do so by inserting the special symbol (short for non-breaking space) in the page. When a Web page is displayed by a browser, each occurrence of the special symbol is displayed as a space, no matter where it appears in the text.
The HTML document in EXAMPLE 2.2 demonstrates the use of paragraph and break elements, as well as non-breaking spaces. When displayed in a browser window, each paragraph will have a blank line before and after. The first paragraph contains a break element, so its text will be broken across two lines. The second paragraph relies on the browser to wrap lines to fit the screen but does contain non-breaking spaces to highlight a word.
EXERCISE 2.4: Click on the "See in Browser" button to confirm that the page appears as described. Then, add a new paragraph between the two existing ones (i.e., between the closing tag </p> of the first paragraph and the opening tag <p> of the second paragraph). Your paragraph should contain multiple sentences.
In addition to <p> and <br>, there are other HTML tags that can be inserted to perform common text formatting. Text enclosed in the tags <b></b> will appear in bold, <i></i> tags indicate text in italics, and <u></u> tags indicate underlined text. In addition, <sup></sup> tags indicate a superscript (as in mc2) and <sub></sub> tags indicate a subscript (as in H2O). The HTML document in EXAMPLE 2.3 includes several text formatting examples.
EXERCISE 2.5: Click on the "See in Browser" button to confirm that the page appears as described. Then, add two new paragraphs to the document that appear as follows:
When dealing with multiples of 2 (e.g., 21, 22, 23, ...), it is important to remember that adding one to the exponent doubles that value. That is, 2n+1 = 2*2n.
For example,
29 = 512
210 = 1024
As you create Web pages with HTML tags, it is inevitable that you will make typing mistakes. Unfortunately, the browser is not smart enough to recognize and fix seemingly obvious errors, such as misspelling a tag name or forgetting to insert a closing tag.
- If you misspell an opening tag, e.g.,
<sud>instead of<sup>, the browser will just ignore it. - If you omit or misspell a closing tag, the browser will ignore that tag, which means that the opening tag remains in effect. For example, if a paragraph contains "
this is", the browser will ignore the<b>bold</d>and this is not</d>tag and text will display subsequent text in bold: "this is bold and this is not". - If you nest HTML elements, such as "
<b><i>bold and italicized</i></b>", you should always close the tags in reverse order. In this example, there is anielement nested inside of abelement. If you list the closing tags in the wrong order, the browser may be confused and format incorrectly. - The browser will make some assumptions about the document based on structure. For example, a paragraph cannot contain another paragraph, so if you forget the closing
</p>tag on one paragraph, a subsequent<p>tag will cause the browser to end the first paragraph before beginning the next one. It is best not to rely on this, however, so be careful to always include closing tags.
EXERCISE 2.6: Experiment with making HTML typos in the document from EXAMPLE 2.3 and observe the results. For example, make the following modifications and observe how the page is affected.
- Remove the opening
<b>tag in the line:Here is some <b>bold text</b>. - Remove the closing
</i>tag in the line:Here is some <i>italicized text</i>. - Change the opening tag
<sub>to<sum>in the expression:H<sub>2</sub>O. - Change the closing tag
</sup>to</sud>in the expression:mc<sup>2</sup>.
Headings
In a large document, it is often useful to divide the content into sections and provide each section with a heading that describes its contents. HTML includes tags that enable Web designers to specify headings of various sizes. For example, text enclosed between the tags <h1> and </h1> is displayed in large, bold letters and separated from adjacent text by blank lines. The tags <h2> and </h2> display a heading in slightly smaller letters, <h3> and </h3> display even smaller letters, and so on down to <h6> and </h6>. For example,
Level 1 Heading (h1)
Level 2 Heading (h2)
Level 3 Heading (h3)
Level 4 Heading (h4)
Level 5 Heading (h5)
Level 6 Heading (h6)
Headings of varying sizes are useful for dividing a page into sections and subsections (and subsubsections, and so on). To further divide different parts of a document, designers can separate sections with a horizontal line using the <hr> tag (where hr stands for horizontal rule). Note that there is no closing tag corresponding to the <hr> tag. EXAMPLE 2.4 below shows a document divided into sections with lines and headings.
EXERCISE 2.7: Click on the "See in Browser" button to confirm that the page appears as described. Then, make the following modifications to the document.
- Change the heading size on the "Second Section" heading to
h3. - Rename the current "Subsection" heading to be "Subsection 1". Then, add an additional subsection below it with heading "Subsection 2". Add two paragraphs (content of your choice) to this new subsection.
- Finally, add a horizontal rule at the bottom of the page.
Lists
When organizing text in a page, it is often convenient to list related items in a sequence. For example, you might want to list your hobbies or favorite movies in your home page. HTML provides two different elements for organizing lists. In an unordered list, individual items are preceded by bullets (solid circles), as shown below on the left. In an ordered list, the items are numbered in sequence, as shown below on the right.Unordered List
|
Ordered List
|
In HTML, an unordered list is identified by the tags <ul> and </ul>, whereas an ordered list is identified by the tags <ol> and </ol>. In either type of list, the individual list items are delimited by the tags <li> and </li>. For example, the HTML document in EXAMPLE 2.5 contains list elements corresponding to the examples above.
EXERCISE 2.8: Click on the "See in Browser" button to confirm that the page appears as described. Then, make the following modifications to the document.
- Add your two favorite hobbies to the bottom of the unordered list.
- Add your two favorite movies to the top of the ordered list.
- Add a new unordered list at the bottom of the page, listing four bands/artists that you enjoy listening to.
- Add a new ordered list at the bottom of the page, listing the top three places you would like to visit.
Tables
Although it is usually preferable to let the browser determine how text is laid out within a page, there are times when you want things to line up just so. For example, suppose that you want to display information about yourself. Aligning that information into columns can make it more attractive and easier to read.| Name: | Chris |
| Age: | 20 |
| Hometown: | Omaha |
| Major: | Computer Science |
In HTML, tables are used to organize text and other elements into rows and columns. Elements in the same row appear on the same line when displayed by a browser (as is the case with "Name:" and "Chris" above). Elements in the same column are aligned on the left-hand side (as is the case with "Chris", "20", "Omaha", and "Computer Science"). Web designers specify a table element using the tags <table> and </table>. Individual rows in the table are identified by <tr></tr> (short for table row), and the number of columns is determined by the number of data items in the rows, as identified by <td></td> (short for table data). Every time you end one row element and begin another, the browser places the first data item in the first column of that new row. For example, the HTML document in EXAMPLE 2.6 contains two table elements, both of which display the above student information organized into columns. The table is included twice to remind you that extra spacing in an HTML document is ignored by the browser. The second table element takes advantage of this feature by adding spaces within the HTML element to make the table structure more obvious when viewed in the editor.
EXERCISE 2.9: Click on the "See in Browser" button to confirm that the page appears as described. Then, make the following modifications to the document.
- Add a new row to the 2nd list, which has "University:" and "Creighton" in the two columns.
- Add a new table at the bottom of the page, listing 4 cartoon characters. There should be columns for the character name, type and show. For example,
Bart Simpson human The Simpsons Mr. Peabody dog The Rocky and Bullwinkle Show Patrick sea star SpongeBob SquarePants Mr. Meeseeks ??? Rick and Morty
Hypertext
While all the examples we've seen so far involve embedding and formatting text within a page, Web pages can go beyond just text. In fact, the term hypertext in Hypertext Markup Language translates to "beyond text." Two non-text elements that appear in many Web pages are hyperlinks and images.
Hyperlinks
A hyperlink, or link for short, is an element on a Web page that connects the page to another page or online resource. Links in a page are typically displayed as underlined and colored text, such as Web site for this book. When a Web user clicks on a link, the browser loads the connected page, regardless of its physical location on the Web. Thus, by following a chain of links, a user can explore related documents, even if the documents are stored on computers thousands of miles apart.
A link is embedded into an HTML document using the tags <a> and </a>, with the text between the tags serving as the link label. In this context, a is short for anchor, signifying that the link anchors (i.e., connects) separate documents together. To be complete, an <a> tag requires an href attribute (short for Hypertext REFerence) to specify the location of the linked document. In general,
<a href="ADDRESS_OF_PAGE">TEXT LABEL FOR LINK</a>
The Web address (formally known as a Uniform Resource Locator or URL) assigned to the href attribute uniquely identifies the document being linked. A Web address can be a remote (or external) address, meaning that it specifies the URL of a document stored remotely on the Web, or a local (or internal) address, meaning that it specifies a document stored locally, in the same location as the Web page. Remote addresses are identified by a prefix, either http:// or https://.
For example, the HTML document in EXAMPLE 2.7 contains two links, both remote addresses. The first link connects with the address https://freecsc.com/index.html, identifying the file named index.html that is stored on the remote freecsc.com Web server. The second link connects to the same page but takes advantage of the fact that index.html is the default home page for a Web site. If a remote address lists only a server name (e.g., freecsc.com), the browser will automatically append index.html to the address.
EXERCISE 2.10: Click on the "See in Browser" button to confirm that the page appears as described. Test the links to ensure that they correctly load the specified pages. You may note that the link label is one color (typically, blue) when you first view the page in the browser, but then changes to a different color (typically, purple) after visiting. The browser uses color to differentiate unvisited and visited links.
EXERCISE 2.11: Modify the document to include a link to your favorite Web site. The link should have a descriptive label that clearly denotes the link destination. Test your new link to make sure that it correctly takes you to the specified page. Does the link change color after you have visited that page?
 Common Errors to Avoid
The distinction between the prefixes http:// and https:// in remote Web addresses is a subtle one. Most commercial Web sites provide support for secure connections, meaning that the pages being viewed are protected from outside observers. The 's' in https:// denotes that this secure connection is to be used. However, the https:// prefix will not work if the Web site does not support this feature.
The Web site that hosts this book supports https, so we will use that prefix when accessing book chapters and images throughout.
Designer Secrets
When adding links in a page, it is important to provide a descriptive label so that the user knows where the link would take them. The most effective links are embedded in text that provides context and are short enough to be distinct. For example, if you wanted to provide a link to the Creighton University Web site on your home page, you could embed the link within a paragraph, such as:
I am currently a student at Creighton University studying computer science.
The color and underline clearly identify "Creighton University" as a link. Plus, the link label clearly describes the destination, so the user knows its purpose. For readability's sake, avoid excessively (and unnecessarily) long link labels, such as the following:
I am currently a student at Creighton University studying computer science
Also, avoid adding redundant instructions in links, such as
Click here for the Creighton Web site.
Images
In HTML, images are embedded in a page using an img tag. Standard browsers have built-in capabilities for displaying images in GIF (Graphics Interchange Format), PNG (Portable Network Graphics) and JPG (Joint Photographic Experts Group) formats, which are the most common formats for digital images. To display other types of image formats, the browser may require special-purpose extensions called plug-ins. Therefore, if you want an image to be viewable by all Web users, it is advisable to limit yourself to GIF, PNG, and JPG formats.
An img tag typically has two attributes associated with it. The src attribute specifies the Web address of the image file to be displayed, and the alt attribute specifies alternate text that appears if the image can't be found or displayed properly. The general form of an image element is:
<img src="ADDRESS_OF_IMAGE" alt="TEXT_DESCRIPTION">
Similar to file addresses in a link, the address in an img tag can be remote (denoting an image file stored remotely on a Web server) or local (denoting a file stored in the same directory as the current page).
When displaying an image, the browser will automatically adjust the page contents to fit the dimensions of the image. Thus, a small image (e.g., an icon) will take up very little space in the page, whereas a large image (e.g., a high-resolution photograph) may dominate the page. The height and width attributes can be added to an img tag to specify the display dimensions (in pixels, short for picture elements).
The HTML document in EXAMPLE 2.8 contains three img elements with the same remote address, (https://freecsc.com/Images/TimBernersLee.jpg). The first displays the image at its default size, which is 320 pixels wide and 400 pixels high. The second img element displays the image at half that size (by setting the height to 200) and the third displays it at quarter size (by setting the width to 80).
EXERCISE 2.12: Click on the "See in Browser" button to confirm that the page appears as described. Then, locate an image on the Web that somehow appeals to you. Add an img element to the HTML document that displays this image. Be sure to include a height or width attribute to specify its size.
To identify the address (URL) of an image on the Web, you can right-click on the image and select "Copy Image Address" or an equivalent option (depending on your browser). You can then paste that address into the src attribute of your img element. Note: if you do not have right-click set up on your mouse, control-click on a Mac or shift-F10 on a Windows computer work as well.
EXERCISE 2.13: To demonstrate the use of a local image (i.e., an image with a local address), follow the steps below:
- Download a copy of the HTML document in EXAMPLE 2.8 by clicking on the "Download" link. Save this document to your desktop.
- Next, locate an image file from the Web that somehow appeals to you. Download this image to your Desktop by right-clicking on the image and selecting "Copy Image Address" or an equivalent option (depending on your browser). Note: if you do not have right-click set up on your mouse, control-click on a Mac or shift-F10 on a Windows computer work as well.
- Finally, add an
imgtag to the HTML document and assign itssrcattribute to be the name of the image file you saved (without thehttps://prefix). View the page in a browser window to confirm that the local image is displayed correctly.
Common Errors to Avoid
It is possible to specify both the height and width in an img tag but doing so is problematic. If the original aspect ratio between height and width is not maintained, the image can be distorted (flattened or stretched, as shown below). To avoid distortion when resizing an image, specify either height or width and allow the other dimension to be automatically adjusted.

Be aware that adjusting the height or width attributes of an img element only affects the way the image is displayed in the page. If the image is huge, say a 3000x2000 pixel photograph, the entire image (all six million pixels) must still be downloaded, regardless of the dimensions used for its display. If you have a large, high-resolution image that you want to display in a Web page, it is best to create a smaller, lower-resolution version of the image using image editing software to avoid excessive download times.
Putting It All Together
This chapter introduced HTML as a language for creating Web pages. By inserting HTML tags into a text document, you can organize the page contents, format the text as desired, and even embed images and links. As an example that utilizes an assortment of HTML tags, consider a page honoring HTML inventor, Sir Tim Berners-Lee (FIGURE 1).
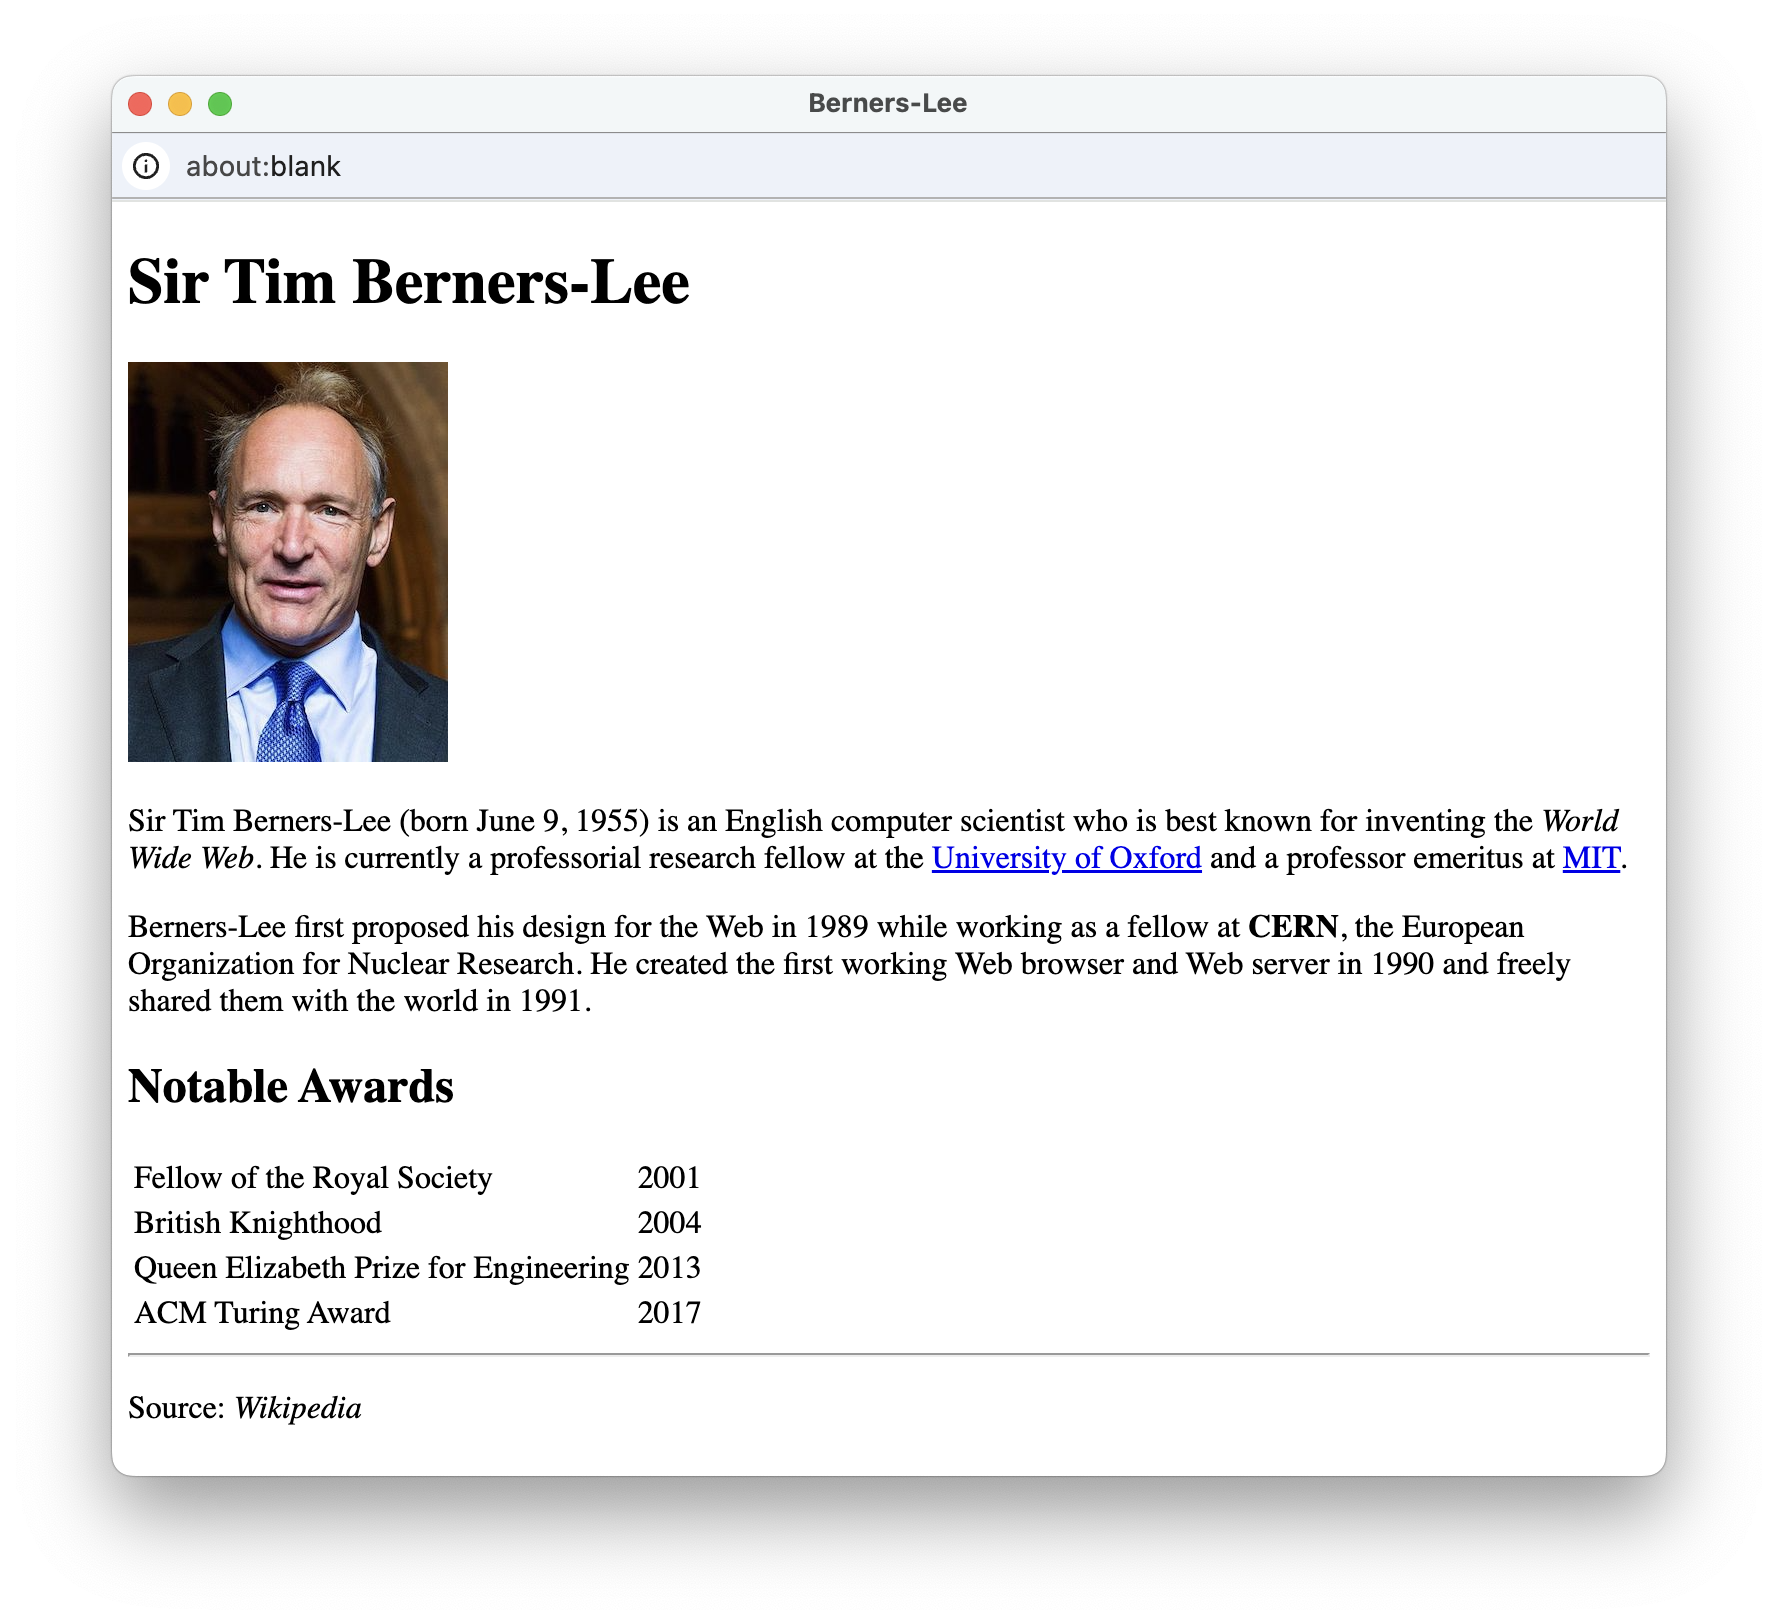
FIGURE 1. Web page about Tim Berners-Lee.
The HTML document in EXAMPLE 2.9 produces this page.
There are several details to note about this document.
- The page utilizes two headings. An
h1heading appears at the top of the page, displaying his name in large, bold letters. A smallerh2heading appears later in the page, identifying the table of awards. - The
imgelement has asrcattribute that identifies the Web address of the image file:https://freecsc.com/Images/TimBernersLee.jpg. Since this address begins with the prefixhttps://, it is a remote address, specifying a file stored on a server on the Web. Theimgelement also has analtattribute specifying an alternative description and aheightattribute specifying the height of the image (200 pixels). - Biographical information is organized into two paragraphs using
pelements. Within those paragraphs, text formatting is performed using<i></i>and<b></b>tags for italics and bold, respectively. There are two links<a>embedded in the first paragraph, both withhrefattributes that link to remote Web pages (https://ox.ac.ukandhttps://mit.edu). - Notable awards, along with the years they were received, are organized in a table. As such, the years align even though the award names are of differing length.
- Finally, a horizontal line
<hr>separates the page contents from the source accreditation at the bottom of the page.
Chapter Summary
- A Web page is a text document that contains additional formatting information in a language called HTML (HyperText Markup Language).
- A Web browser is a program that displays Web pages by interpreting the HTML and formatting the page accordingly. A Web server is a computer that runs special software for storing and retrieving pages.
- HTML specifies formatting within a page using tags. An HTML element, the building block of Web pages, is made up of text enclosed in tags that indicate the text's purpose within the page.
- Every HTML document should begin with the tag
<!doctype html>. - The content of an HTML document is contained between the tags
<html>and</html>and is divided into two sections. The head contains the title of the page, which appears in the browser tab when that page is displayed. The body contains the text and formatting that is to appear within the page. - A
metatag contains metadata about the page, such as the author's name. - A browser automatically formats text to fit the current window, ignoring blank lines and extra spacing within the HTML document. A Web designer can control spacing in Web pages by using the
<br>tag, which explicitly breaks a line of text. Similarly,<p>and</p>tags specify a new paragraph (surrounded by blank lines). In addition, the symbol inserts a space into text. - Text enclosed in the tags
<b></b>will appear in bold,<i></i>tags indicate text in italics,<u></u>tags indicate underlined text,<sup></sup>tags indicate a superscript and<sub></sub>tags indicate a subscript - The tags
<h1></h1>,<h2></h2>, ...,<h6></h6>can be used to display section headings of decreasing sizes;<hr>draws a horizontal line across the page. - A list can be used to organize items in a page. An unordered list (identified by
<ul></ul>) displays each item preceded by a bullet, whereas an ordered list (identified by<ol></ol>) displays each item preceded by a number. In both variants, individual list items are identified by<li></li> - A table can be used to organize items into rows and columns. A table is identified by
<table></table>, with individual rows identified by<tr></tr>and entries within that row identified by<td></td>. - Hyperlinks to other HTML documents can be embedded in a Web page using an
aelement, with attributehrefspecifying the Web address (formally known as a Uniform Resource Locator, or URL) of the linked file. - A remote (or external) address (with prefix
http://orhttps://) denotes a file stored on a remote Web server, whereas a local (or internal) address without the prefix denotes a file stored in the same directory as the current page. - Images can be embedded in a Web page using an
imgelement, with attributessrcspecifying the Web address of the image file andaltspecifying alternative text. - The size of an image in a page can be controlled by assigning either the
heightorwidthattribute of theimgelement. When one of these dimensions is changed, the other is automatically changed to maintain the aspect ratio.
Projects
All the HTML documents you create should utilize the standard structure shown in this chapter:
- They should begin with the tag
<!doctype html>. - Below the
!doctypetag should be anhtmlelement, and within that element there should be aheadelement and abodyelement. - The
headelement should contain ametatag with your name and atitleelement specific to that page. - The
bodyelement should contain all the page contents. - Replace the name
Dave Reedin themetatag with your name. - Locate a different photo of Tim Berners-Lee on the Web and download it to your computer (recall: instructions for downloading an image are provided in Chapter X1). Add an
imgelement somewhere in the page that displays your local image. - Research Berners-Lee and find something you think is interesting about his life. Add a new section to your page with an
h2heading and a paragraph that describes this interesting information. Be sure to include a link to the Web page where you found this information. - As a famous scientist and inventor, Berners-Lee has been awarded honorary degrees at numerous institutions. These include Southampton University, Oxford University, Harvard University and Parsons School of Design. Add an unordered list to your page that lists these four institutions.
- A large heading appears at the top of the page, which includes your name.
- A paragraph below the heading should describe the collection of photos, with information such as when and where the photos were taken.
- A horizontal line appears directly below the paragraph.
- Finally, at least five images should appear below the line. There should be no explicit line breaks between the images, so that the browser can fit them on the same line(s) when possible. To make the images look uniform, make sure they are all displayed with the same height.
- A large heading appears at the top of the page, which includes your name.
- The page has multiple sections, each with its own heading and multiple paragraphs of text (each with multiple sentences). You should use
p,br,hrand appropriately to organize the page contents. - It utilizes at least one of the following to format text:
b,i,u,suporsub. - It contains at least one list (either ordered or unordered) with multiple list items.
- It contains multi-dimensional information organized in a table, with multiple rows and columns.
- It contains at least five hyperlinks to sites that you consider useful and/or interesting. To confirm that these links work correctly, you should click each one and then view the linked page in your browser.
- It contains at least two images. One of the
imgelements should utilize a remote address for an image file stored somewhere on the Web. Another should utilize a local address to an image file stored on your computer (in the same folder asindex.html). Be sure to include alternate text for your images via thealtattribute.
PROJECT 2.A: Download a copy of the HTML document in EXAMPLE 2.9 (by clicking on the Download link) and save it on your computer. Using a text editor of your choice, make the following modifications/additions to your document:
PROJECT 2.B: Using a text editor of your choice, create a photo gallery page named photos.html. This page should display a collection of photos, with a descriptive paragraph. It must have the following features:
PROJECT 2.C: Using a text editor of your choice, create a simple Web page for yourself named index.html. This page can contain information about you (your family, hobbies, interests, ...) or it can be on any subject you prefer. It must have the following features:
PROJECT 2.D: If you have access to a Web server account, upload your page and the accompanying image file to that server. This will make your page accessible to the world. Note that it is important that you named your page index.html. This is the default name for the home page on a server. By using this file name, a person accessing your page merely needs to type in the server address, and the name index.html is automatically assumed. For example, the home page for this book is stored on the server freecsc.com. If you type that server address into the browser, it will automatically append index.html onto the end and load freecsc.com/index.html.