
X1: Development Basics
The good news about computers is that they do what you tell them to do. The bad news is that they do what you tell them to do. — Ted Nelson
I think it's fair to say that personal computers have become the most empowering tool we've ever created. They're tools of communication, they're tools of creativity, and they can be shaped by their user. — Bill Gates
This text is designed to provide a balanced coverage of computer technology and its impacts. The Concept chapters (C1-C12) focus on understanding important concepts in computing, such as how computers work, the history of the Internet and Web, and how computers and artificial intelligence are impacting society. The Exploration chapters (X1-X10) provide hands-on experience using a computer to create interactive Web pages. By experiencing the process of designing, implementing and debugging programs in a Web setting, you will gain a deeper understanding of the power and potential pitfalls of software. This chapter introduces to some of the development tools you will use throughout the text.
Interactive Exercises
The Exploration chapters encourage developing programming skills using a tutorial format. That is, the introduction of new concepts and techniques are interleaved with interactive examples and exercises that demonstrate and reinforce those concepts and techniques. The interactive examples follow a common format, as shown in EXAMPLE 1.1 below:
To the right of the example is an editable box that contains the example code. In this example, there is just the simple sentence "My name is Dave Reed." in the box. To the left is a blue box that contains a button labeled "See in Browser." When you click on the button, the content of the box is displayed in a separate Web browser window.
EXERCISE 1.1: Click on the "See in Browser" button in EXAMPLE 1.1. You should see "My name is Dave Reed." displayed in a separate window. Don't worry about the title at the top of the window (about:blank). You will learn how to insert a more meaningful title in the Chapter X2.
EXERCISE 1.2: Modify the text in the box so that it contains your name instead of "Dave Reed". Click on the button to confirm that your name appears in the browser window.
The blue box at the left of the example also includes a link labeled "Download". This feature will be useful when you want to save the contents of the box to your computer. For example, you might be in the middle of completing an exercise in the box but need to pause to grab dinner or attend a class. If you close the chapter and later return, your changes will be lost, and the example will revert to its original contents. To save your work, click on the "Download" link. For example, clicking on the "Download" link in EXAMPLE 1.1 will download the contents of the box to your computer under the file name example1-1.html.
EXERCISE 1.3: Download the modified box contents to a file on your computer. By default, the file will be stored in your Downloads folder. Move that file to your Desktop for easier access.
EXERCISE 1.4: Reload this chapter in your browser. The box in EXAMPLE 1.1 should revert to its original content (with "Dave Reed"). If you open the file you saved to your computer using some text editor or word processor, you can copy the content of that file and paste it into the EXAMPLE 1.1 box. Do so and confirm that the saved edits are now restored in the example box.
Opening a Page
if you just want to view the document that you downloaded without any further edits, you do not need to copy its contents back into the example box. Instead, you can open that file directly in the browser. If the document is saved with a .html extension, simply clicking on the file icon will automatically open it in your default browser (e.g., Chrome). Alternatively, you can open the browser and select "Open File" under the "File" command at the top of the browser window. This will open a navigation window that will enable you to find and select the desired file that you wish to view.
EXERCISE 1.5: Click on the downloaded file icon (example1-1.html on your Desktop). This should open the file in your default browser. Confirm that this works as described.
Text Editors
The interactive examples in this book are a simple and convenient way to explore new Web page features as they are introduced. If you want to create a complex Web page, however, a more advanced editing tool is needed. A text editor is a program in which you can type and edit text, then save that text in a file. Common examples are NotePad, which comes free with Microsoft Windows, and TextEdit, which comes free on Apple computers. Many software companies also offer free or low-cost text editors that provide special features, such as automatic indentation, color coding and helpful error messages. Brackets is an example of a simple and free text editor that is available for both Windows and Apple computers. Below, we describe the steps involved in creating, editing and saving documents in the Brackets text editor.
The Brackets Editor
Brackets is a free text editor developed by Adobe, Inc. It is a simple yet powerful editor that is ideal for a beginning Web developer, and so is highly recommended in conjunction with this book. To download and install Brackets on your computer, click on the appropriate link below (depending on whether you are using a Mac or Windows computer).
Once the chosen installer has been downloaded, double-click on it and follow the instructions for installing Brackets on your computer.
Before you open Brackets and start creating/editing files, it is important to get organized. If you are planning to develop your own Web pages in conjunction with exercises and projects from this book, you will want to be 100% clear as to where on your computer those pages are being stored. The easiest way to do this is to create a folder dedicated to the book (or perhaps to a class using the book). For example, you could create a folder named FreeCSC in your existing Documents folder. Or, if this book is being used for a course, you could name the folder for the course, e.g., csc121. The important thing is that you remember the name of the folder and where it is stored, so that you can keep track of the pages you create.
EXERCISE 1.6: Follow the steps above to install the Brackets editor on your computer. Once that is completed, create a folder where you will be storing the pages that you create.
You are now ready to open the Brackets editor and explore its functionality. When you open the editor, you will see the window in FIGURE 1.
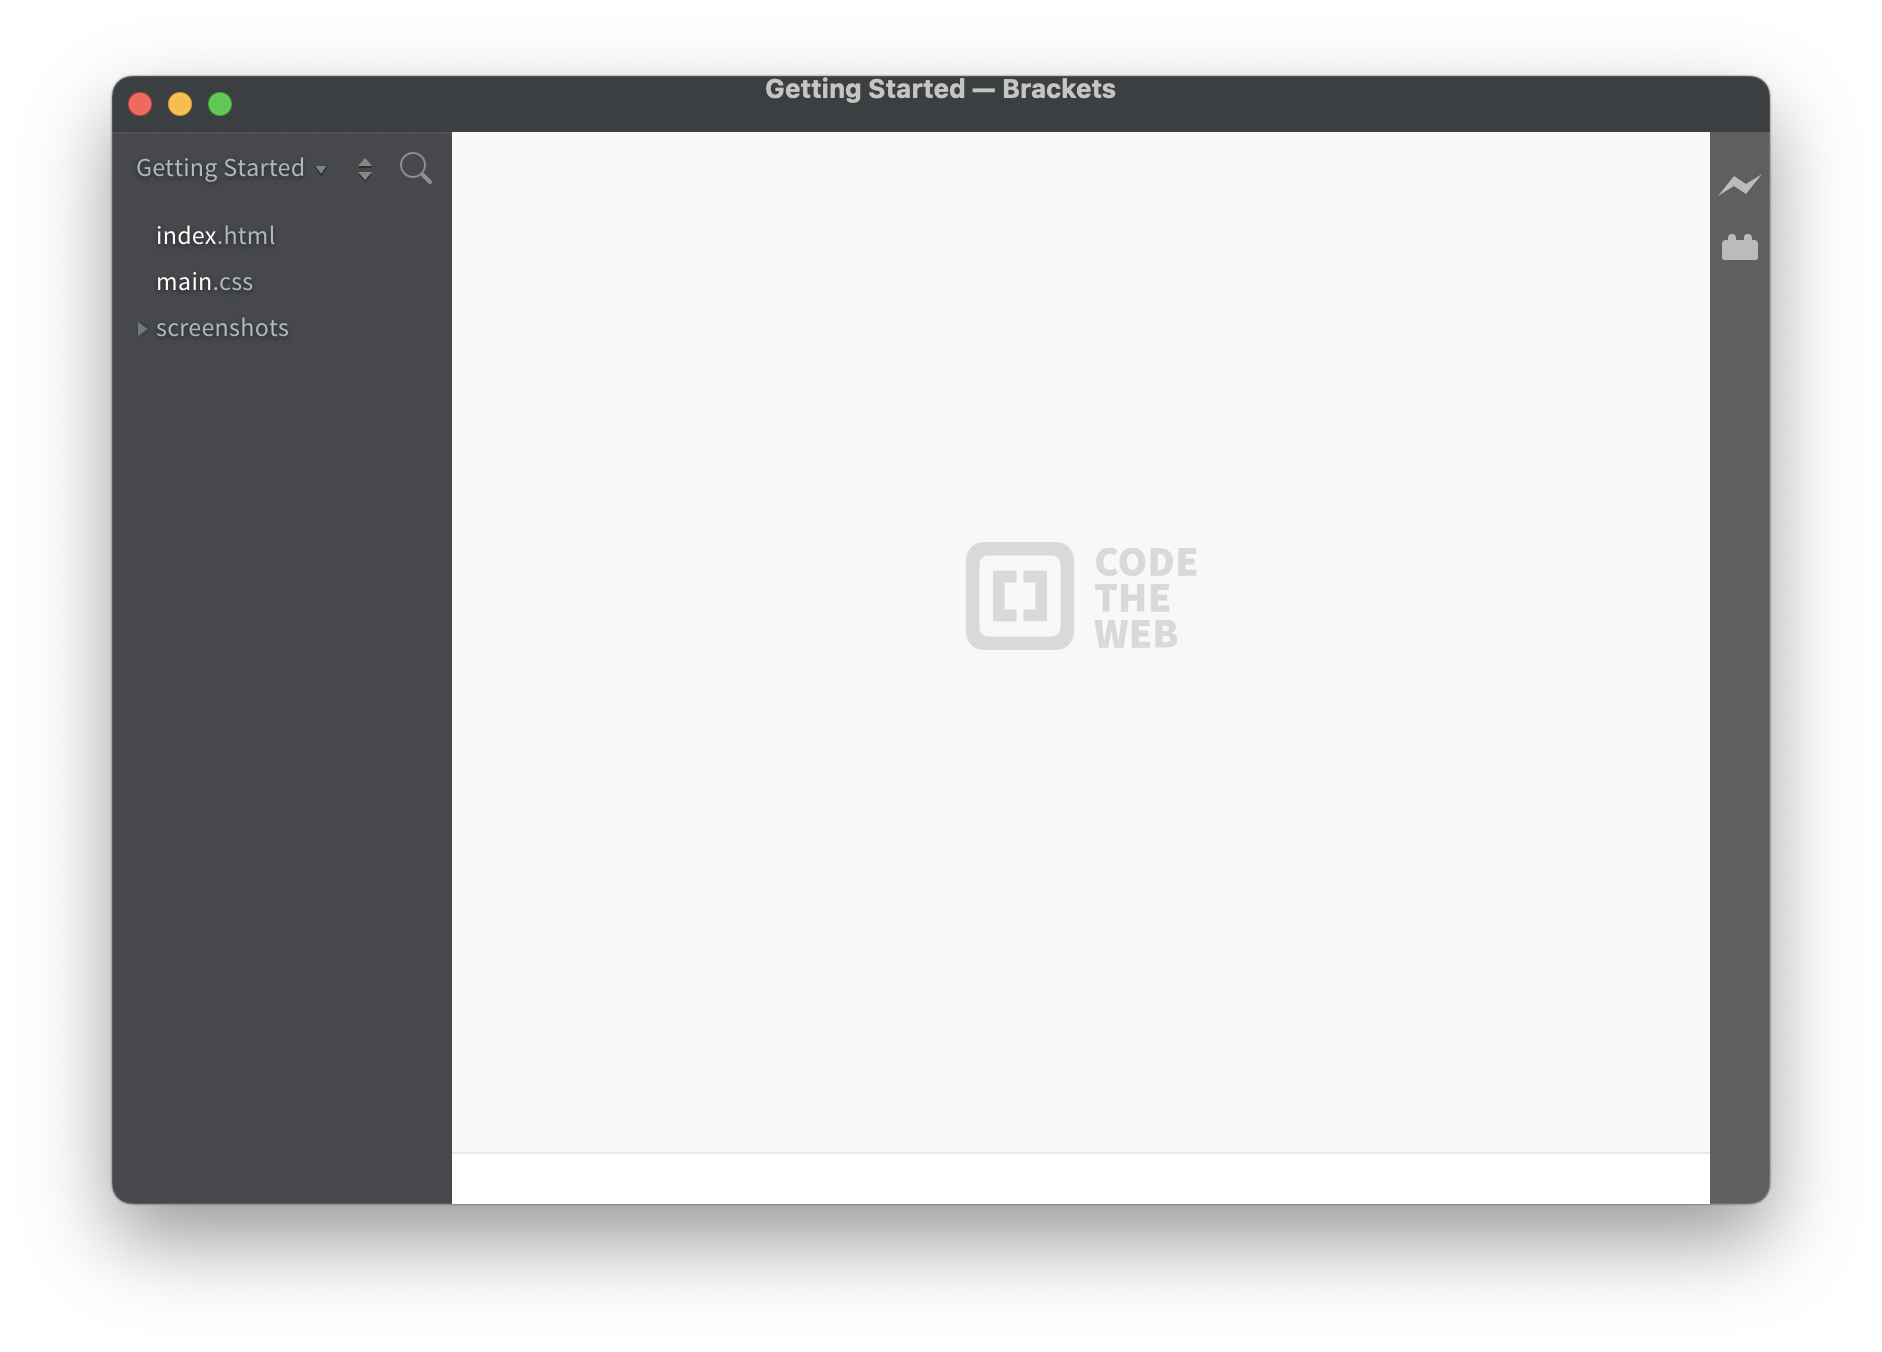
FIGURE 1. The initial Brackets window.
The large white area is where files will be displayed when editing them. Since no file has been created, this area is initially blank (other than the Brackets logo). To the left is a listing of the working folder, where files will be accessed. The default working folder is "Getting Started," which contains two demo files (index.html and main.css). To direct Brackets to use the folder you just created as its working folder, go to the "File" command at the top of the screen and select "Open Folder" from the menu. Navigate to the folder you created and select it. Your folder name should then be displayed in the left panel and also at the top of the screen. Since no files have yet been created in that folder, there will be no files listed on the left (FIGURE 2).
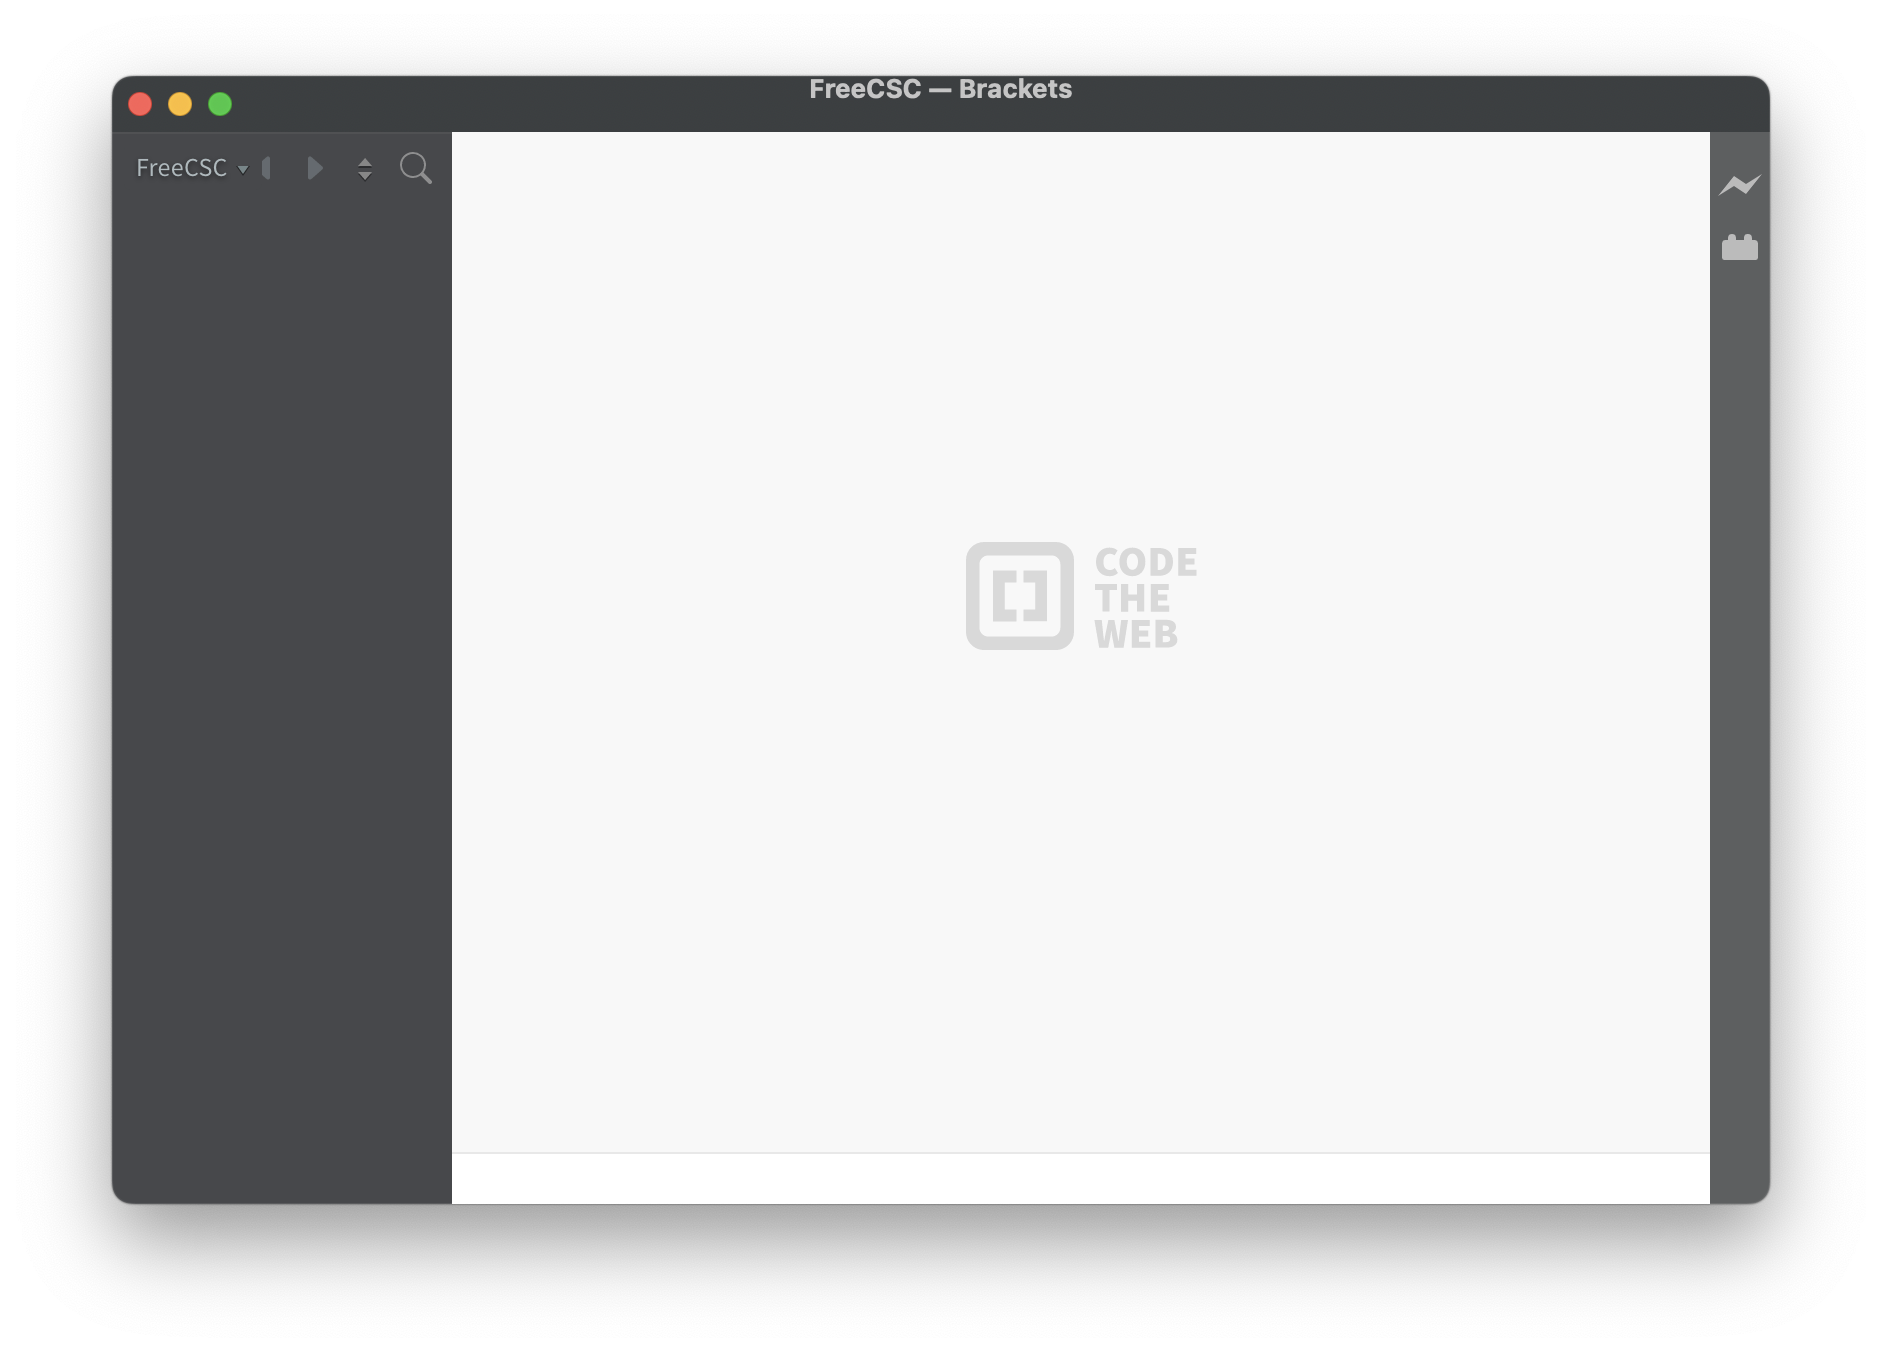
FIGURE 2. Brackets editor with FreeCSC as working folder.
Untitled-1. A blinking cursor appears in the edit area, denoting that you are now able to type into the file. However, while the file is listed as a "Working File," it will not be listed under the FreeCSC folder heading until it is saved. To save the file in the working folder, go to the "File" command at the top of the screen and select "Save." This will open a window where you can specify a more appropriate name, e.g., basic.html, to denote a VERY basic Web page. FIGURE 3 shows the created but still empty file, with the file name now appearing both as a "Working File" and under the FreeCSC folder name. The file and folder names also appear at the top of the Brackets window.
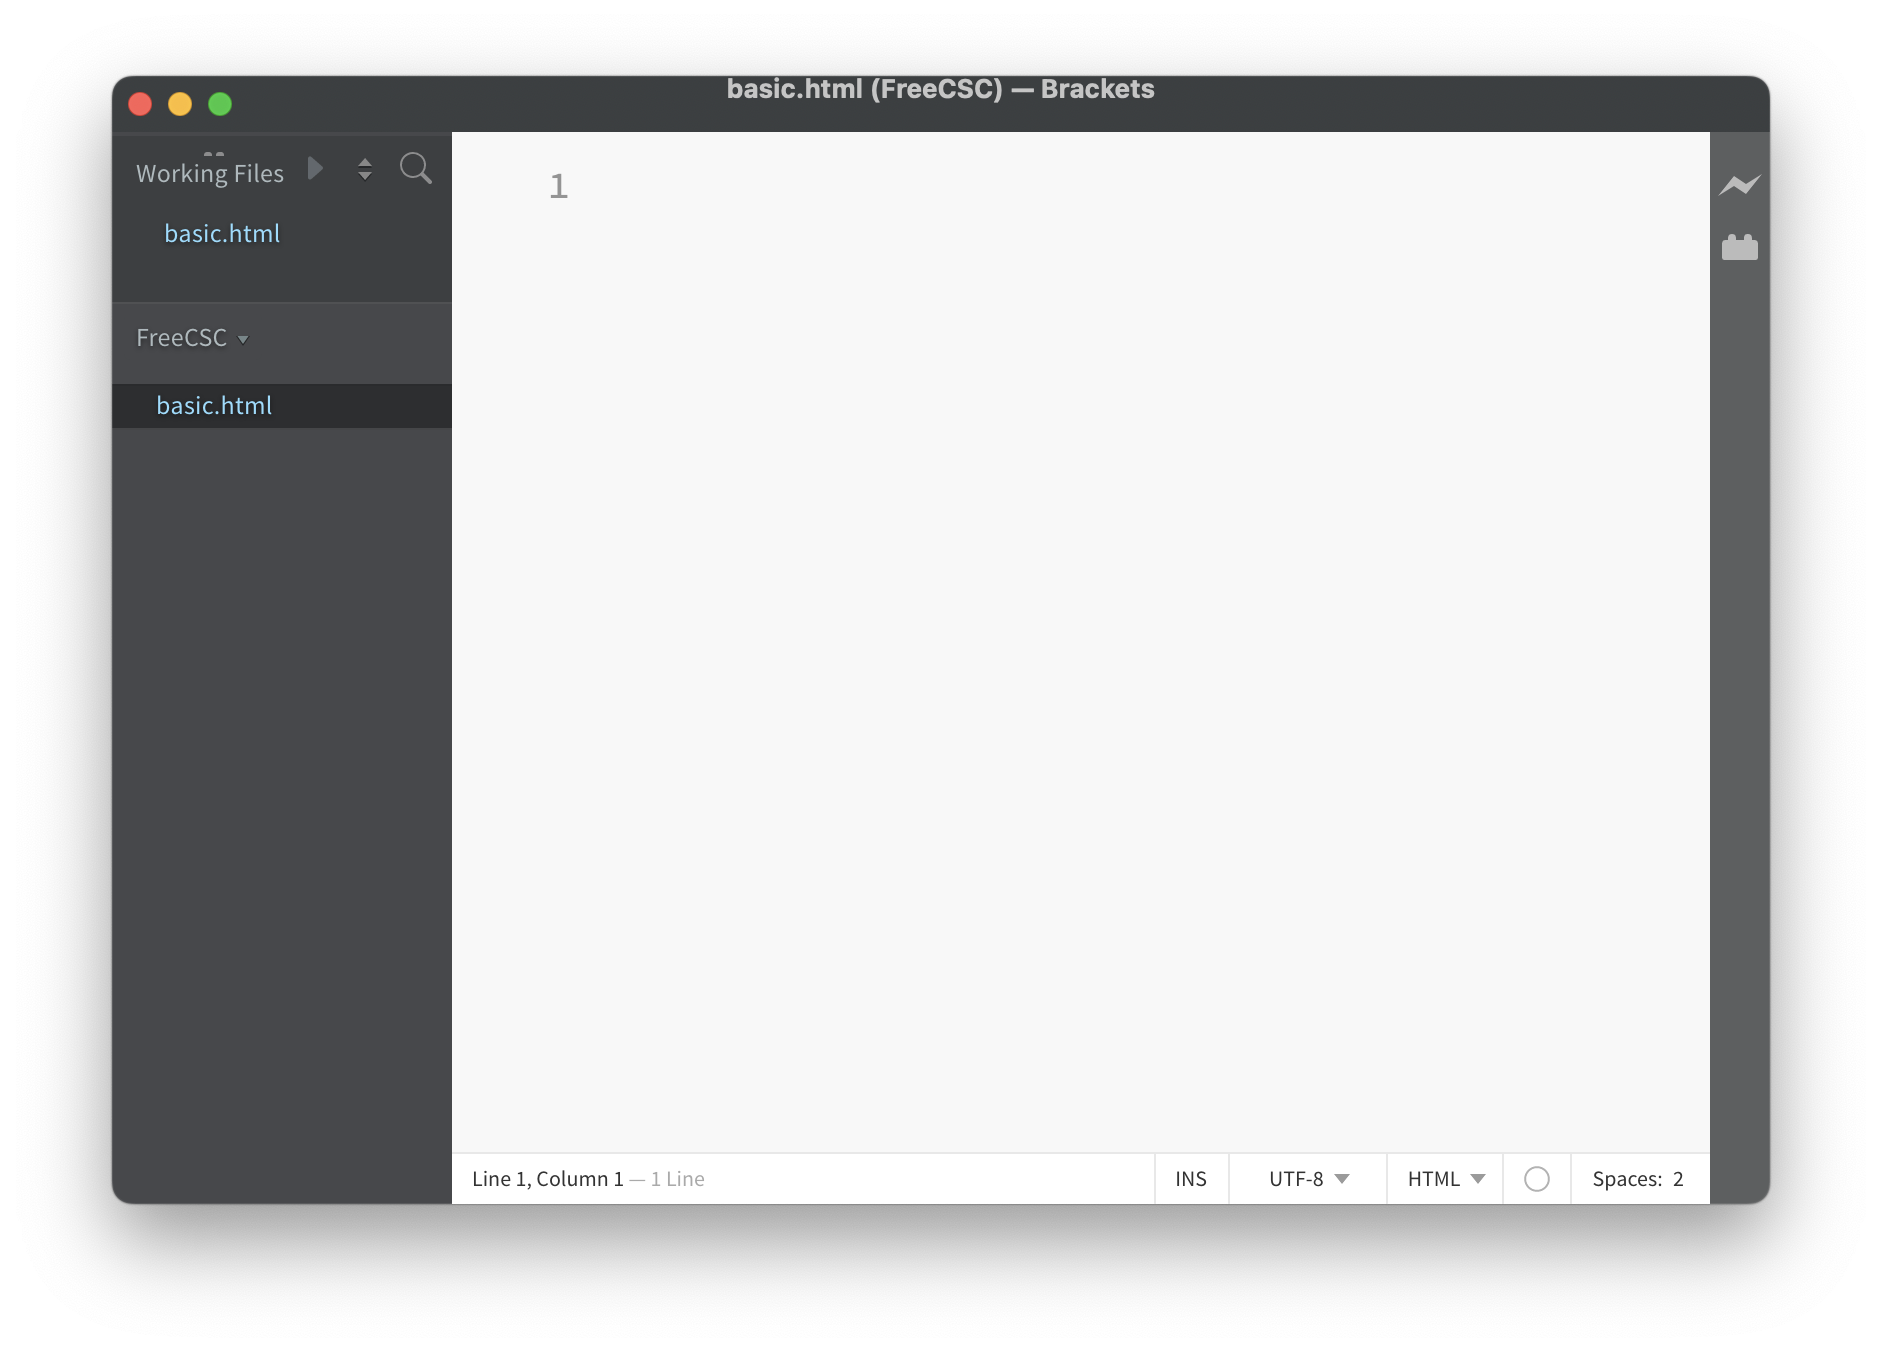
FIGURE 3. Brackets editor with created file.
You can now type whatever text you want into the file. You may note that when you begin typing, a circle appears next to the file name at the top and of the screen and in the "Working Files" listing to the left (FIGURE 4). This circle denotes changes to the file that have not yet been saved. Once you save the file (using the "Save" option under the "File" menu"), the circle will disappear.
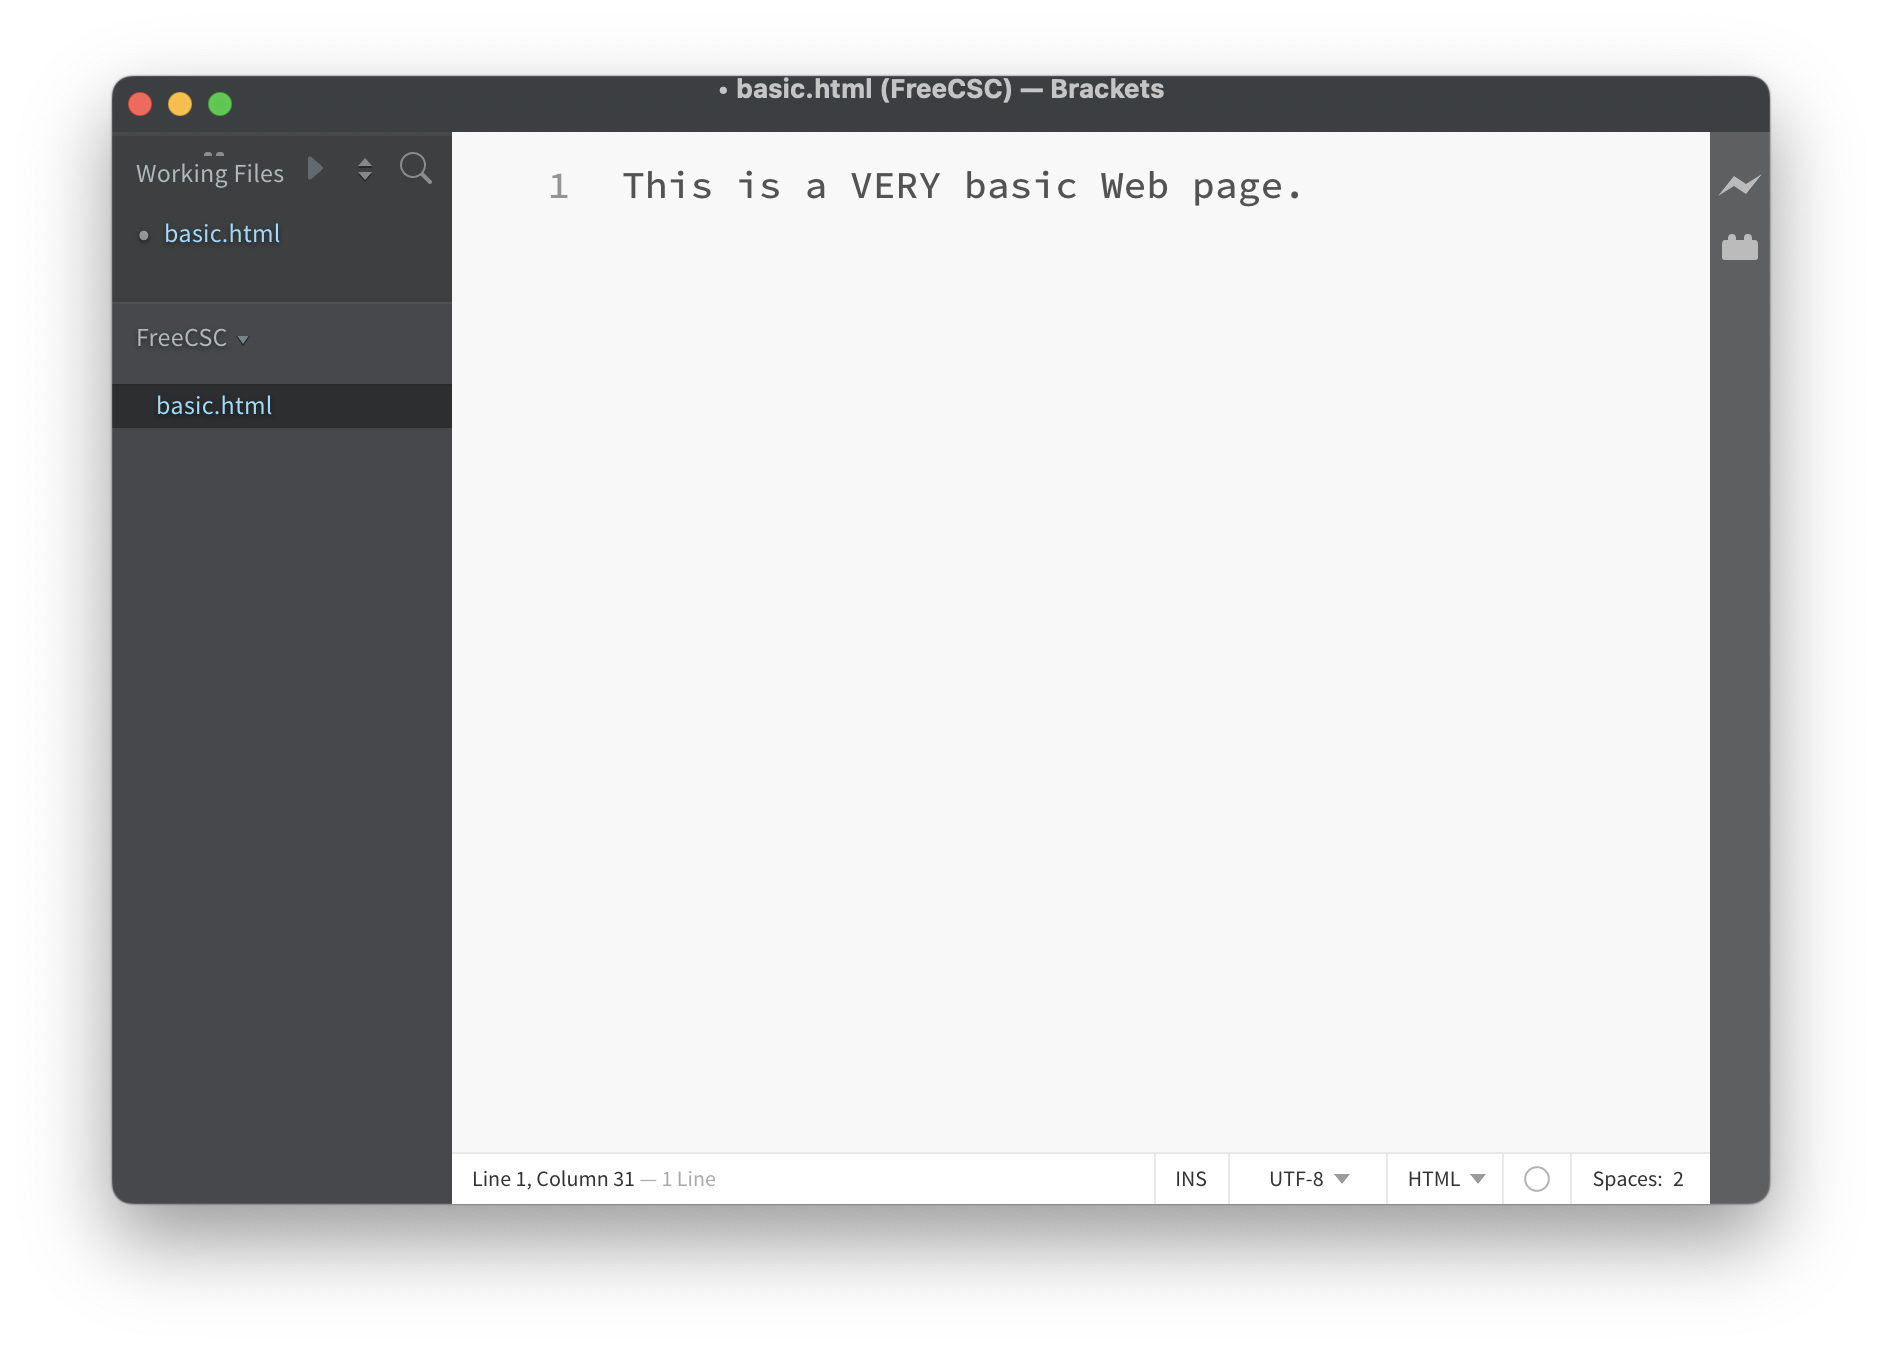
FIGURE 4. Brackets editor with modified file.
EXERCISE 1.7: Follow the steps above to create a new file named basic.html that is stored in your working folder. Enter whatever text you would like into the file and save it.
One of the most useful features in Brackets for Web development is Live Preview. In the top-right corner of the Brackets window is an icon that looks like a lightning bolt. When you click on that icon, a Chrome browser window will open and display your page (assuming that Chrome is installed on your computer). This is a handy feature when you are developing a page, since it allows you to quickly see how your page will look in a browser. If you make additional edits to the file in Brackets and save those edits, the browser window will automatically update to include those revisions (FIGURE 5).
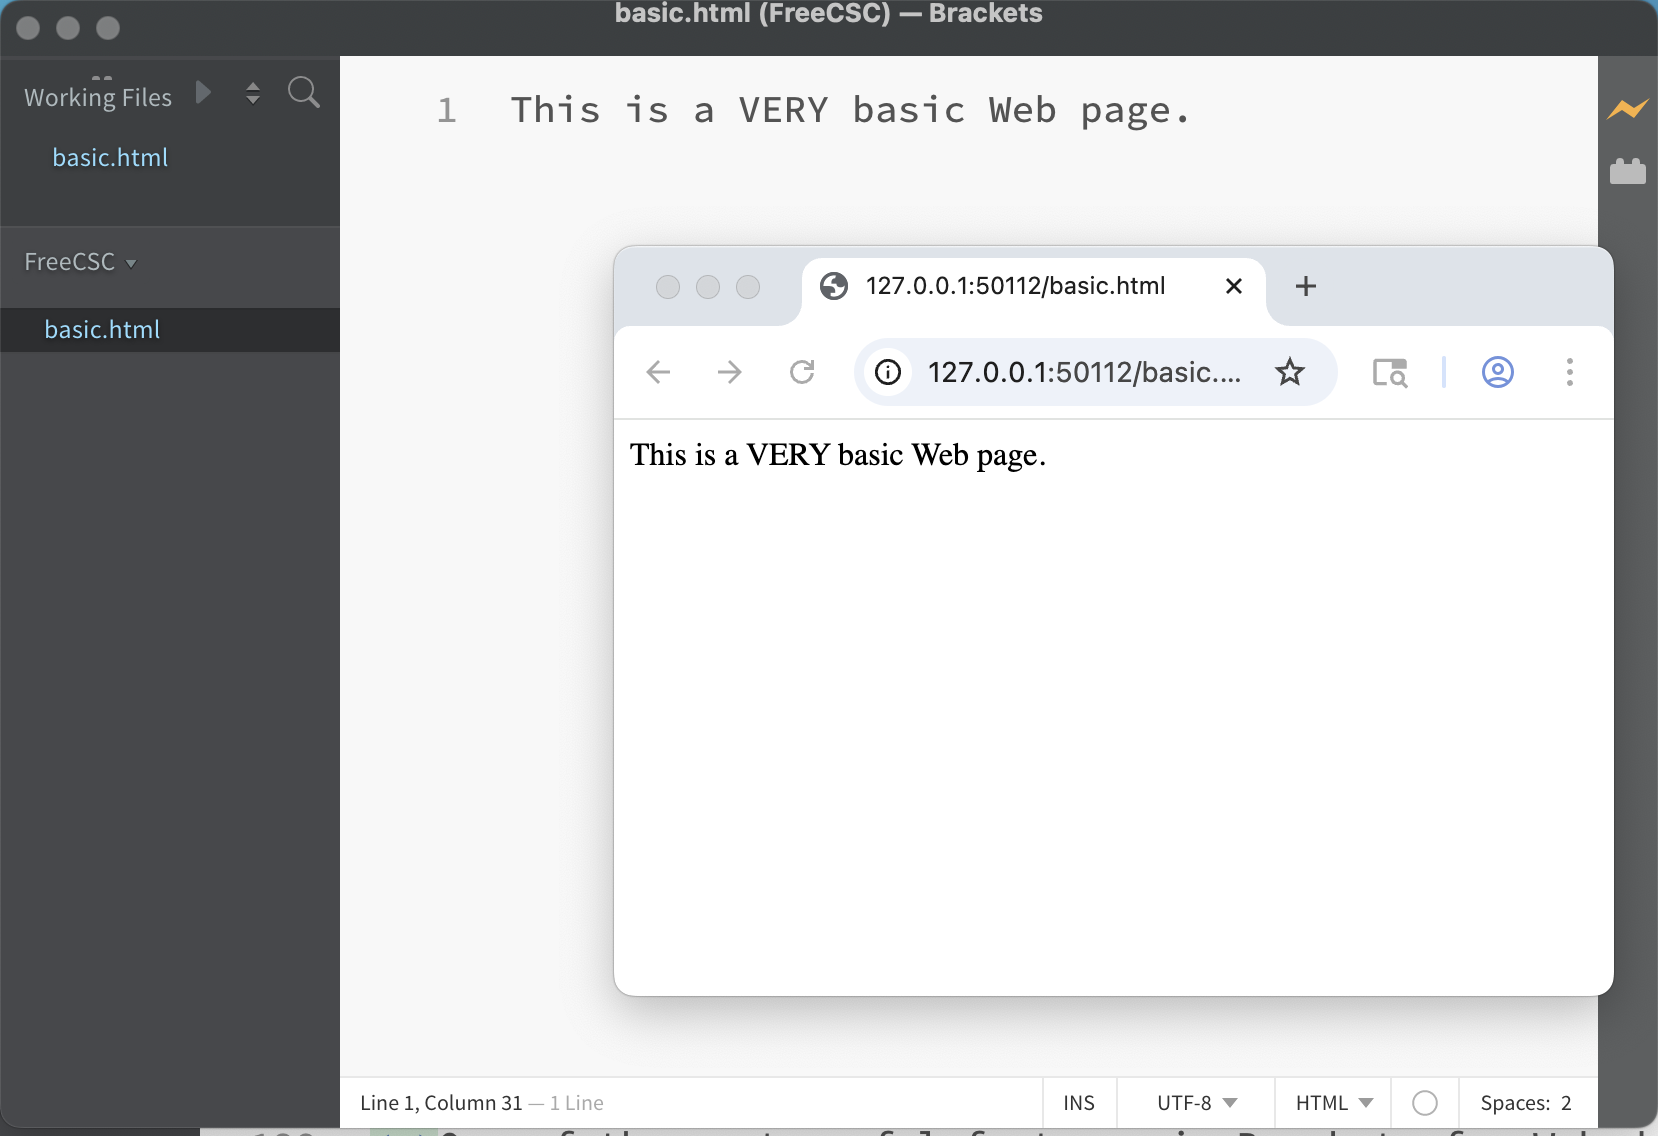
FIGURE 5. Brackets editor with LIVE Preview.
If you entered multiple lines of text into your file, you might be surprised to find that they are not formatted the same in the Live Preview. In chapters X2 and X3, you will learn how to control the content and layout of the page when it is displayed.
EXERCISE 1.8: Use the Live Preview feature to view the file you created. Keep the browser window open and add several more sentences to your file. After you save those changes, the Live Preview should automatically update to include those changes. Confirm this behavior.
Web Skills
As you learn to develop your own Web pages in subsequent chapters, there are basic skills you will need to develop. Most Web pages are not just text — images and videos often make the page more attractive and easier to understand. Likewise, you will want to be able to share and upload files that you created. one of the skills that will be useful is being able to locate and download images from the Web.
Downloading an Image
Before you can download an image from the Web, you must first locate it. This may be trickier than it sounds, since many Web sites display images in a gallery but hide the actual files from the user. If you right-click on an accessible image, one of the options should be "Save Image as..." or something equivalent (depending on your browser). Note: if you do not have right-click set up on your mouse, control-click on a Mac or shift-F10 on a Windows computer work as well.
To download the image once you find it, right-click and select the "Save Image as..." (or equivalent) option. A window will appear in which you can select the location and name for the file. Note: when downloading images from the Web, you must be careful not to violate copyrights or otherwise infringe upon the rights of the owner. Unless explicitly stated otherwise, you should assume that any image on the Web is private property.
EXERCISE 1.9: Open a browser window to the home page for this book: freecsc.com. At the bottom of the page is a picture of the author. Download a copy of this image to the Desktop your computer. To confirm that it downloaded correctly, double click on the image file icon on your Desktop. This should open the image in your default image viewer (e.g., Preview on a Mac or Paint on Windows).
Today's digital cameras can take incredibly high-resolution images. For example, the Fujifilm GFX 100 II can take photographs consisting of more than 100 million pixels (or picture elements). Depending on the file format used, a single image taken by that camera can require up to 150 MB (megabytes) of storage. When displaying an image on a Web page, images of this size are overkill, as computer screens are incapable of displaying that high of a resolution. Plus, the time that it takes to download even a 15 MB image over the Web can be significant. A good rule of thumb is that images embedded in Web pages should never exceed 500 KB (kilobytes) in size. Most images you find on the Web are much smaller.
Determining the size of a downloaded image is easy: right click on the image file and select either "Get Info" (on a Mac) or "Properties" (on Windows). Information about the file, including its size, will be displayed in a small window. If you have an image that exceeds the 500 KB limit, there are many applications that you can use to reduce the size of the image file. Preview is a simple tool that is preinstalled on Macs, while Paint is a similar tool for Windows computers. In both programs, you can open an image file and adjust its dimensions (width and height) and/or resolution (pixels per square inch) to reduce the file size. In Preview, this is done by selecting "Change size" from the "Tools" menu; in Paint, you simply click on the "Resize" icon. You can also save or export the image using a different file format. For photographs, JPG tends to be the most compact file format, requiring only a fraction of the space that the equivalent GIF or PNG file would take.
EXERCISE 1.10: Confirm that the image file you downloaded is smaller than 500 KB in size.
Zipping Files Together
As you create files, e.g., Web pages and images, you might want to share them. For example, you might want to mail a collection of images to a friend or upload a Web page and an image together for a class assignment. Having to add multiple attachments or conduct multiple uploads can be tedious. Both Mac and Windows provide a simple alternative: zipping multiple files together into a single file known as a zip file. A zip file is a file that is created by joining multiple files together. A zip file can be easily shared and the original files extracted when desired.
To combine multiple files into a zip file, you simply highlight the files using your mouse and right-click on the grouping. On a Mac, select the "Compress" option from the resulting menu; for Windows, select "Send to" and then "Compressed." This will create a single file with the extension .zip. You can then share this zip file as a single attachment or upload. To extract the contents of a zip file, simply double-click on the file icon and a new folder will be created containing the original files.
In addition to making it simpler to share multiple files, zip files also make sharing more efficient. The files are compressed when they are zipped together, usually resulting in a zip file that is significantly smaller than the combined sizes of the original files. The compressed size means that uploads are faster and less storage is required.
EXERCISE 1.11: Select two files on your computer and note their sizes (using "Get Info" or "Properties"). Then, zip those two files together using the steps outlined above. Is the size of the resulting zip file smaller than the combined sizes of the original files? Finally, double-click on the zip file to extract the original files.
Chapter Summary
- Interactive examples, which are embedded in upcoming Exploration chapters, demonstrate and reinforce concepts and techniques as they are introduced.
- Each example has a box that contains example code. By clicking on the "See in Browser" button, you can view the example in a separate browser window.
- Since the box is editable, you can make changes or additions to sample code and view the results in a browser window.
- You can download the contents of an example box to your computer by clicking on the "Download" link.
- If a document is stored in a file with a
.htmlextension, double-clicking on its file icon will open that document in your default browser. - A text editor is a program in which you can type, edit and save documents.
- Brackets is a free text editor that is available in for both Mac and Windows computers.
- The Brackets editor has multiple features that are optimized for editing Web pages and so is ideal for accompanying this text.
- To download an image from the Web, you must first locate the image file and then right-click and select "Save Image as..." or something equivalent (depending on your browser).
- If you rename an image file, you should NOT change its extension (e.g.,
.jpg,.pngor.gif) as this identifies the format of the file. - Image files on the Web should not exceed 500 KB (kilobytes) in size, as larger files can take significant time to download, and screens are incapable of displaying high resolutions. Applications such as Preview (for Macs) and Paint (for Windows) can be used to reduce the size of image files.
- Multiple files can be "zipped together" into a single zip file, shared or uploaded, and then extracted.
Projects
PROJECT 1.A: Using Brackets, create a file named "YOURNAME.html" where YOURNAME is your name. Enter the following information in the file:
- Your name
- Town you call home
- Your occupation (if a student, list your year)
- Your hobbies/interests
- Your favorite movie
- Your favorite musical artist
- Your favorite color (if you have one)
- Something unique about yourself
- Any experiences you have had with computers or programming
- A Web site you find informative or engaging
You should have a number before each entry and a blank line between entries. Note: as this file is stored with a .html extension, it can technically be viewed in Bracket's Live Preview. However, it will not be very readable since you do not yet know how to control the layout of the text in a Web page.
PROJECT 1.B: Locate an image on the Web that somehow resonates with you. It may be a picture of you or a family member that has been previously uploaded to a Web site. It may be of a person you admire or a sports team that you follow. Or it may just be an image that you find beautiful or inspiring. Download that image to your computer and rename it YOURNAME.XXX, where YOURNAME is your name and XXX is the existing format of the image file (.jpg or .png or .gif).
If the image file exceeds 500 KB in size, use a program such as Preview or Paint to reduce its size so that it is below the 500 KB threshold. If the image is stored using a format other than JPG, simply saving/exporting that image as a JPG file might suffice. If not, reduce the dimensions of the image and/or its resolution to reduce the file size. Note: even high-end computer screens are incapable of displaying more than 160 pixels per square inch, so this is a safe lower bound for reducing the image resolution.
PROJECT 1.C: Zip together the files you created in PROJECTS 1.A and 1.B. Rename the resulting zip file YOURNAME.zip. You can confirm the correctness of the zip file by double-clicking on it and viewing the extracted files.